• Home
  • Courses
  • Machines
    • Transformer
    • AC Motors
      • Induction Motor
      • Synchronous Motor
    • DC Motor
    • DC Generator
  • Power System
    • Circuit Breaker
    • Switchgear
    • Substation
    • Control System
    • Measurement
  • Electronics
  • Blog
  • Contact
    • Contact Us
    • Privacy Policy
Have any question?
[email protected]
Login
StudyElectrical.Com
  • Home
  • Courses
  • Machines
    • Transformer
    • AC Motors
      • Induction Motor
      • Synchronous Motor
    • DC Motor
    • DC Generator
  • Power System
    • Circuit Breaker
    • Switchgear
    • Substation
    • Control System
    • Measurement
  • Electronics
  • Blog
  • Contact
    • Contact Us
    • Privacy Policy

    Projects

    Automatic Irrigation System Using Arduino

    • Categories Projects, Arduino
    Automatic Irrigation System Using Arduino

    In this project, we will make an automatic irrigation system using Arduino microcontroller. Automatic Irrigation system monitors the soil moisture and depending on set points turns on/off the pump which is connected to the relay. This way you can keep soil moisture to a set point.

    This system automatically waters the plants when we are on vacation. As we are setting the soil moisture level, we need not worry about too much of watering and the plants end up dying anyway.

    The project is designed to develop an automatic irrigation system which switches the pump motor ON/OFF on sensing the moisture content of the soil. This project requires Arduino board having inbuilt ATMega328
    microcontroller.

    An automated irrigation system will minimize the excess wastage of water and the labor and other overheads.

    In the field of agriculture, use of a proper method of irrigation is important. The advantage of using this method is to reduce human intervention and still ensure proper irrigation.

    Table of Contents

    • Components Required for this Project
    • Automatic Irrigation System Circuit
    • Working of Automatic Irrigation System
    •  Automatic Irrigation System Arduino Code
    • Related Articles

    Components Required for this Project

    You need the following items to complete this project.
    1. Arduino Uno
    2. Soil moisture sensor
    3. 16×2 LCD
    4. 1K, 220E Resistors
    5. 12V Relay
    6. BC548 Transistor
    7. Switches

    Automatic Irrigation System Circuit


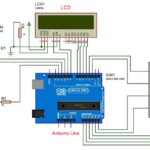
    Automatic%2BIrrigation%2BSystem%2BUsing%2BArduino

    LCD displays the current moisture level and set point. The setpoint can be adjusted using push buttons. Connect relay output to the water pump. Put soil moisture tip in the soil where you want to maintain soil moisture.

    Working of Automatic Irrigation System

    The soil moisture sensor senses the moisture present in the soil and gives the output to Arduino. The output of the sensor will be from 0-1023. The moisture is measured in percentage, therefore we should map these values to 0-100.
     
    Whenever the moisture value is lower than the value we have set inside our code as the threshold value, the relay will turn ON and the valve will turn open and whenever the moisture value is lower than this threshold value, the relay will relay will turn OFF and the valve will get closed.

     Automatic Irrigation System Arduino Code

    /*
    Automatic Irrigation System
    */
    #include <LiquidCrystal.h>
    // initialize the library with the numbers of the interface pins
    LiquidCrystal lcd (9, 8, 7, 6, 5, 4);
    const int LED_RED =10; //Red LED
    const int LED_GREEN =11; //Green LED
    const int RELAY =12; //Lock Relay or motor
    //Key connections with arduino
    const int up_key=3;
    const int down_key=2;
    int SetPoint =30;
    //=================================================================
    // SETUP
    //=================================================================
    void setup (){
    pinMode ( LED_RED , OUTPUT );
    pinMode ( LED_GREEN , OUTPUT );
    pinMode ( RELAY , OUTPUT );
    pinMode ( up_key, INPUT );
    pinMode ( down_key, INPUT );
    //Pull up for setpoint keys
    digitalWrite ( up_key, HIGH );
    digitalWrite ( down_key, HIGH );
    // set up the LCD's number of columns and rows:
    lcd . begin(16, 2);
    // Print a message to the LCD.
    lcd . print ("studyelectrical.com");
    lcd . setCursor (0,1); //Move coursor to second Line
    lcd . print (" Irrigation ");
    delay(1000);
    lcd . setCursor (0,1);
    lcd . print (" System ");
    digitalWrite ( LED_GREEN , HIGH ); //Green LED Off
     digitalWrite ( LED_RED , LOW ); //Red LED On
    digitalWrite ( RELAY , LOW ); //Turn off Relay
    delay(2000);
    }
    //=================================================================
    // LOOP
    //=================================================================
    void loop (){
    double WaterLevel = ((100.0/1024.0) * analogRead ( A0 )); //Map it in 0 to 100%
    lcd . setCursor (0,0);
    lcd . print ("Water :"); //Do not display entered keys
    lcd . print ( WaterLevel );
    lcd . print ("% ");
    //Get user input for setpoints
    if( digitalRead ( down_key)== LOW )
    {
    if( SetPoint >0) //Not less than zero
    {
    SetPoint --;
    }
    }
    if( digitalRead ( up_key)== LOW )
    {
    if( SetPoint <99) //Not more than 100%
    {
    SetPoint ++;
    }
    }
    //Display Set point on LCD
    lcd . setCursor (0,1);
    lcd . print ("Set Point:");
    lcd . print ( SetPoint );
    lcd . print ("% ");
    //Check Temperature is in limit
    if( WaterLevel > SetPoint )
    {
    digitalWrite ( RELAY , LOW ); //Turn off water pump
    digitalWrite ( LED_RED , HIGH );
    digitalWrite ( LED_GREEN , LOW ); //Turn on Green LED
    }
    else
    {
    digitalWrite ( RELAY , HIGH ); //Turn on water pump
    digitalWrite ( LED_GREEN , HIGH );
    digitalWrite ( LED_RED , LOW ); //Turn on RED LED
    }
    delay(100); //Update at every 100mSeconds
    }
    //=================================================================
    Related Articles

    • Automatic Light Controller arduino
      Arduino based Automatic Light Controller

      The automatic light controller offers energy saving and convenience in the areas with a photosensor…

    • Controlling a Servo Motor with Arduino
      Controlling a Servo Motor with Arduino

      A servomotor is also defined as a rotary actuator that allows for very fine control…

    • arduino program structure
      How to Structure an Arduino Program?

      If you are new to programming and want to understand how Arduino programs work, read…

    • Arduino Digital Voltmeter
      Arduino DC Digital Voltmeter

      A voltmeter is an instrument used for measuring electrical potential difference between two points in…

    • digital lock arduino
      How to Make a Digital Lock Using Arduino?

      Digital code locks are most common in security systems. An electronic lock or digital lock…

    • maxresdefault
      An Introduction to the Arduino for Beginners

      What is Arduino? Arduino is an open-source platform used for building electronics projects. Arduino consists…

    • Share:
    author avatar
    Electrical Engineer

    Previous post

    What Are Current, Resistance and Voltage?
    December 20, 2017

    Next post

    3D Printed Alternator for Educational Purposes - Video
    December 26, 2017

    You may also like

    Arduino Weather station
    Simple Weather Station using Arduino [Explained]
    9 September, 2022
    arduino program structure
    How to Structure an Arduino Program?
    16 September, 2021
    newbie electronics kits
    Beginner Friendly Kits That Most Newbie Used In Electronics
    16 March, 2020

      4 Comments

    1. Nagraj
      March 14, 2019
      Reply

      Can I get video of this

      • Tesla Edison
        admin
        March 15, 2019
        Reply

        Sorry, we don’t have any video.
        You can find related videos on YouTube.

    2. Marshal
      March 29, 2019
      Reply

      Wow, you made this Arduino projects very well. I love the way you made this Arduino projects.

    3. Creativitybuzz
      April 17, 2019
      Reply

      if you are looking for this type of creative projects than visit my youtube channel creativitybuzz.

    Leave A Reply Cancel reply

    Your email address will not be published. Required fields are marked *

    Search Here

    From Blog

    Insulation Resistance Tester Megger
    Insulation Resistance Test (IR Test) or Megger Test
    16Aug2014
    fundamental requirements of protective relaying
    Basic Relays – Electromagnetic Attraction and Induction Relays
    31Oct2016
    Switchgear-control-panel
    What is Switchgear? | Features, Components and Classification
    19Jul2015
    A hypothetical capacitor
    Capacitors and Capacitance – Working, Unit, Types and Specification
    27Oct2019

    Categories

    • Alternator
    • Arduino
    • Basic Electrical
    • Battery
    • Books
    • Cables
    • Capacitor
    • Career
    • Circuit Breaker
    • Control System
    • DC Generator
    • DC Generator MCQ
    • DC Generator Solved Problems
    • DC Motor
    • DC Motor MCQ
    • Drives
    • Electric Vehicles
    • Electrical Circuits
    • Electrical Machines
    • Electrical Relays
    • Electrical Safety
    • Electronics
    • Embedded System
    • Exams
    • Generation
    • Guest Post
    • HVDC
    • Instrumentation
    • Interview Questions
    • Locomotives
    • MCQ
    • Measurement
    • Microcontroller
    • Objective Questions
    • PCB
    • PLC
    • Power System
    • Problems and Solution
    • Projects
    • Resistor
    • Signals and Systems
    • Single Phase Motors
    • Substation
    • Switchgear
    • Synchronous Motor
    • Three Phase Induction Motor
    • Transformer
    • Transmission Line
    • Uncategorized

    Copyright © 2021 Study Electrical, Inc.

    © StudyElectrical.Com 2021

    Login with your site account

    Lost your password?