• Home
  • Courses
  • Machines
    • Transformer
    • AC Motors
      • Induction Motor
      • Synchronous Motor
    • DC Motor
    • DC Generator
  • Power System
    • Circuit Breaker
    • Switchgear
    • Substation
    • Control System
    • Measurement
  • Electronics
  • Blog
  • Contact
    • Contact Us
    • Privacy Policy
Have any question?
[email protected]
RegisterLogin
StudyElectrical.Com
  • Home
  • Courses
  • Machines
    • Transformer
    • AC Motors
      • Induction Motor
      • Synchronous Motor
    • DC Motor
    • DC Generator
  • Power System
    • Circuit Breaker
    • Switchgear
    • Substation
    • Control System
    • Measurement
  • Electronics
  • Blog
  • Contact
    • Contact Us
    • Privacy Policy

Arduino

How to Structure an Arduino Program?

  • Categories Arduino, Projects
arduino program structure

If you are new to programming and want to understand how Arduino programs work, read this. This article explains how to structure an Arduino program.

To emphasize the agile nature of Arduino development, Arduino programs are commonly referred to as sketches. A sketch and a program can be used interchangeably.

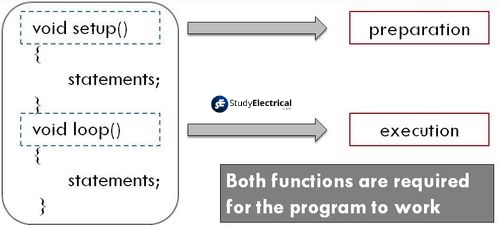
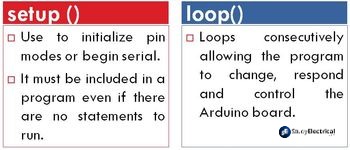
These sketches contain the code – the instructions the board will follow. All sketches are divided into two parts – setup function and loop function. You should put code that will run only once (for example, code to set up a board for the application) in the setup function. The loop function contains the code that will be run continuously after the initial setup is complete.

Arduino Program Structure

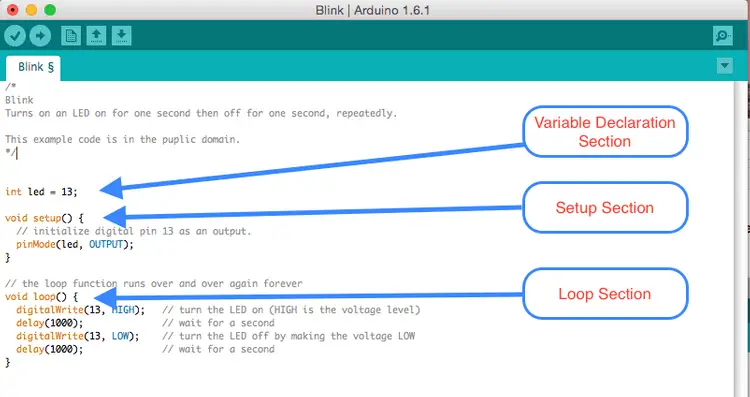
Here is a typical sketch:

const int ledPin = 13; // LED connected to digital pin 13

// The setup() method runs once, when the sketch starts
void setup()
{
pinMode(ledPin, OUTPUT); // initialize the digital pin as an output
}

// the loop() method runs over and over again,
void loop()
{
digitalWrite(ledPin, HIGH); // turn the LED on
delay(1000); // wait a second
digitalWrite(ledPin, LOW); // turn the LED off
delay(1000); // wait a second
}

Once the board has uploaded the code, or once it has been turned on with that code, it executes the instructions sequentially from the top of the sketch. The setup function runs the code once. Then, it runs the code in a loop. The loop continues until it reaches the end (denoted by the closing bracket, }), and then it returns to the beginning of the loop.

setup and loop function of arduino
Setup and Loop function of Arduino

Example of Structured Arduino Program

In this example, a HIGH and LOW output is written to a pin continuously to flash the LED. See An Introduction to the Arduino for Beginners to learn more about using Arduino pins.

const int ledPin = 13; // LED connected to digital pin 13

// The setup() method runs once, when the sketch starts
void setup()
{
pinMode(ledPin, OUTPUT); // initialize the digital pin as an output
}

// the loop() method runs over and over again,
void loop()
{
digitalWrite(ledPin, HIGH); // turn the LED on
delay(1000); // wait a second
digitalWrite(ledPin, LOW); // turn the LED off
delay(1000); // wait a second
}

Upon beginning the sketch, the code in setup sets the pin mode (which allows it to light an LED). Once the code in setup is run, the code in loop (which flashes the LED) is continually used throughout the duration of the Arduino board is powered on.

Where is main()?

While you do not need to know this to create Arduino sketches, experienced C/C++ programmers may wonder where the expected main() entry point function is. Although it’s still there, the Arduino build environment hides it under its covers.

In addition to the sketch code, the build produces an intermediate file that includes the following statements:

int main(void)
{
  init();

  setup();

  for (;;)
     loop();

  return 0;
}

Init() is the first function to be called, which initializes the Arduino hardware. This is followed by a call to the sketch’s setup() function. After that, the loop() function is repeated over and over. Since the for loop never ends, the return statement is never executed.

Related Articles

  • digital lock arduino
    How to Make a Digital Lock Using Arduino?

    Digital code locks are most common in security systems. An electronic lock or digital lock…

  • maxresdefault
    An Introduction to the Arduino for Beginners

    What is Arduino? Arduino is an open-source platform used for building electronics projects. Arduino consists…

  • Automatic Light Controller arduino
    Arduino based Automatic Light Controller

    The automatic light controller offers energy saving and convenience in the areas with a photosensor…

  • Controlling a Servo Motor with Arduino
    Controlling a Servo Motor with Arduino

    A servomotor is also defined as a rotary actuator that allows for very fine control…

  • Arduino Digital Voltmeter
    Arduino DC Digital Voltmeter

    A voltmeter is an instrument used for measuring electrical potential difference between two points in…

  • Automatic Irrigation System Using Arduino
    Automatic Irrigation System Using Arduino

    In this project, we will make an automatic irrigation system using Arduino microcontroller. Automatic Irrigation…

  • Share:
Tesla Edison

Tesla is an Electrical Engineer, Physicist and an Inventor in making. He is a good writer and author of many courses and articles published in this site.

Previous post

Basic Tips for Students to Write an Essay

Next post

Types of Emergency Lighting Systems

You may also like

newbie electronics kits
Beginner Friendly Kits That Most Newbie Used In Electronics
Electromagnetic Flow Meters
Things You Should Know About Electromagnetic Flow Meters
Silver oxide minature cell battery
Miniature cells and Batteries – Silver Oxide, Mercury and Lithium Cells

Leave A Reply Cancel reply

Your email address will not be published. Required fields are marked *

Search Here

From Blog

methods of magnetizing steel bar
3 Methods of Magnetizing a Steel Bar
Open Loop and Closed Loop Control System
Open Loop and Closed Loop Control System (4 Practical Examples Included)
Electrical bushings construction and types
Electrical Bushings – Types, Purpose and Construction with Diagrams
dc motor starter need working
Need of a Starter (3 & 4 Point) in DC Motors

Categories

  • Alternator
  • Arduino
  • Basic Electrical
  • Battery
  • Books
  • Cables
  • Capacitor
  • Career
  • Circuit Breaker
  • Control System
  • DC Generator
  • DC Motor
  • Electric Vehicles
  • Electrical Circuits
  • Electrical Machines
  • Electrical Relays
  • Electrical Safety
  • Electronics
  • Embedded System
  • Exams
  • Generation
  • Guest Post
  • HVDC
  • Instrumentation
  • Interview Questions
  • Locomotives
  • Measurement
  • Microcontroller
  • Objective Questions
  • PCB
  • PLC
  • Power System
  • Projects
  • Signals and Systems
  • Single Phase Motors
  • Substation
  • Switchgear
  • Synchronous Motor
  • Three Phase Induction Motor
  • Transformer
  • Transmission Line
  • Uncategorized

Copyright © 2021 Study Electrical, Inc.

© StudyElectrical.Com 2021

Login with your site account

Lost your password?

Not a member yet? Register now

Register a new account

Are you a member? Login now