• Home
  • Courses
  • Machines
    • Transformer
    • AC Motors
      • Induction Motor
      • Synchronous Motor
    • DC Motor
    • DC Generator
  • Power System
    • Circuit Breaker
    • Switchgear
    • Substation
    • Control System
    • Measurement
  • Electronics
  • Blog
  • Contact
    • Contact Us
    • Privacy Policy
Have any question?
[email protected]
RegisterLogin
StudyElectrical.Com
  • Home
  • Courses
  • Machines
    • Transformer
    • AC Motors
      • Induction Motor
      • Synchronous Motor
    • DC Motor
    • DC Generator
  • Power System
    • Circuit Breaker
    • Switchgear
    • Substation
    • Control System
    • Measurement
  • Electronics
  • Blog
  • Contact
    • Contact Us
    • Privacy Policy

Arduino

Controlling a Servo Motor with Arduino

  • Categories Arduino, Electronics, Microcontroller, Projects
Controlling a Servo Motor with Arduino

A servomotor is also defined as a rotary actuator that allows for very fine control of angular positions. This article explains controlling a servo motor with Arduino in detail.

Many servos are widely available and quite cheap. Servos can drive a great amount of current. This means that you wouldn’t be able to use more than one or two on your Arduino board without using an external source of power.

Table of Contents

  • When do we need Servos?
  • How to control servos with Arduino
  • Wiring Servo to Arduino
    • Firmware for controlling one servo using the Servo library
    • Related Articles

When do we need Servos?

Whenever we need a way to control a position related to a rotation angle, we can use servos. 

Servos can not only be used to move small parts and make objects rotate but can also be used to move the object including them. Robots work in this fashion, and there are many Arduino-related robot projects on the Web that are very interesting.

In the case of robots, the servo device case is fixed to a part of an arm, for instance, and the other part of the arm is fixed to the rotating part of the servo.

How to control servos with Arduino

There is a nice library that should be used at first, named Servo.

This library supports up to 12 motors on most Arduino boards and 48 on the Arduino Mega.

By using other Arduino boards over Mega, we can figure out some software limitations. For instance, pins 9 and 10 cannot be used for PWM’s analogWrite() method (http://arduino.cc/en/Reference/analogWrite).

Servos are provided in three-pin packages:

  • 5 V
  • Ground
  • Pulse; that is, control pin

Basically, the power supply can be easily provided by an external battery, and the pulse still remains the Arduino board.

Wiring Servo to Arduino

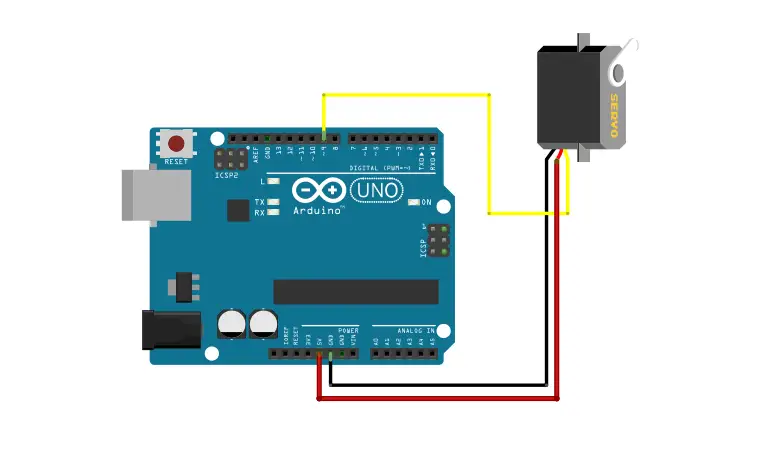
The following diagram is that of a servo wired to an Arduino for both power supply and control:
Controlling a Servo Motor with Arduino
Wiring Diagram to control a Servo Motor with Arduino

A servo motor has 3 output wires. The red and brown wires are connected to the Vcc and Ground respectively.

The yellow pin is the signal pin. It is connected to one of the PWM inputs of the Arduino.

  • Servo red wire – 5V pin Arduino
  • Servo brown wire – Ground pin Arduino
  • Servo yellow wire – PWM pin Arduino

Firmware for controlling one servo using the Servo library

Here is a firmware that provides a cyclic movement from 0 degrees to 180 degrees. 

#include
Servo myServo; // instantiate the Servo object 
int angle = 0; // store the current angle void setup() 
{ 
// pin 9 to Servo object myServo 
myServo.attach(9); 
} 

void loop() 
{ 
for(angle = 0; angle < 180; angle += 1) 
{ 
myServo.write(angle); 
delay(20); 
} 
for(angle = 180; angle >= 1; angle -=1) 
{ 
myServo.write(angle); 
delay(20); 
} 
}

We first include the Servo library header. Then we instantiate a Servo object instance named myServo.

In the setup() block, we have to make something special. We attach pin 9 to the myServo object. This explicitly defines the pin as the control pin for the Servo instance myServo.

In the loop() block, we have two for() loops, and it looks like the previous example with the piezoelectric device. We define a cycle, progressively incrementing the angle variable from 0 to 180 and then decrementing it from 180 to 0, and each time we pause for 20 ms.

There is also a function not used here that I want to mention, Servo.read(). This function reads the current angle of the servo (that is, the value passed to the last-call to write()). This can be useful if we are making some dynamic stuff without storing it at each turn.
Related Articles

  • Arduino Digital Voltmeter
    Arduino DC Digital Voltmeter

    A voltmeter is an instrument used for measuring electrical potential difference between two points in…

  • Automatic Light Controller arduino
    Arduino based Automatic Light Controller

    The automatic light controller offers energy saving and convenience in the areas with a photosensor…

  • arduino program structure
    How to Structure an Arduino Program?

    If you are new to programming and want to understand how Arduino programs work, read…

  • maxresdefault
    An Introduction to the Arduino for Beginners

    What is Arduino? Arduino is an open-source platform used for building electronics projects. Arduino consists…

  • Automatic Irrigation System Using Arduino
    Automatic Irrigation System Using Arduino

    In this project, we will make an automatic irrigation system using Arduino microcontroller. Automatic Irrigation…

  • Build a simple dc motor at home
    How to Make a DC Motor at Home?

    DC Motors works on the principle that they convert electrical energy (from a battery or…

  • Share:
author avatar

Previous post

Potential Difference and EMF: Are they Same?

Next post

Types of ROM | PROM, EPROM, EEPROM, Flash EPROM & Mask ROM

You may also like

Flex-PCB
How to get most of Flex and Rigid-Flex PCBs?
hdl pcb
HDI PCB Boards: All you need to know
dc voltage source
What is a Voltage Source? | DC and AC Voltage Sources Explained

Leave A Reply Cancel reply

Your email address will not be published. Required fields are marked *

Search Here

PCBWay

From Blog

ELECTRICAL IMPEDANCE MADE EASY
Video Tutorial: Electrical Impedance – A Practical View
A hypothetical capacitor
Capacitors and Capacitance – Working, Unit, Types and Specification
Dc machine generator and motor construction
Advantages of Operating DC Generators in Parallel
load forecasting in power system
Load Forecasting – Purpose, Classification and Procedure

Categories

  • Alternator
  • Arduino
  • Basic Electrical
  • Battery
  • Books
  • Cables
  • Capacitor
  • Career
  • Circuit Breaker
  • Control System
  • DC Generator
  • DC Motor
  • Electric Vehicles
  • Electrical Circuits
  • Electrical Machines
  • Electrical Relays
  • Electrical Safety
  • Electronics
  • Embedded System
  • Exams
  • Generation
  • Guest Post
  • HVDC
  • Instrumentation
  • Interview Questions
  • Locomotives
  • Measurement
  • Microcontroller
  • Objective Questions
  • PCB
  • PLC
  • Power System
  • Projects
  • Signals and Systems
  • Single Phase Motors
  • Substation
  • Switchgear
  • Synchronous Motor
  • Three Phase Induction Motor
  • Transformer
  • Transmission Line
  • Uncategorized

Copyright © 2021 Study Electrical, Inc.

© StudyElectrical.Com 2021

Login with your site account

Lost your password?

Not a member yet? Register now

Register a new account

Are you a member? Login now