To help realise a successful electronics design project, it is typically necessary to know not only what resistors are and why they are so critical, but also how to select the correct one.
This brings us onto the subject of the colour bands that you are likely to have seen on the body of a resistor.
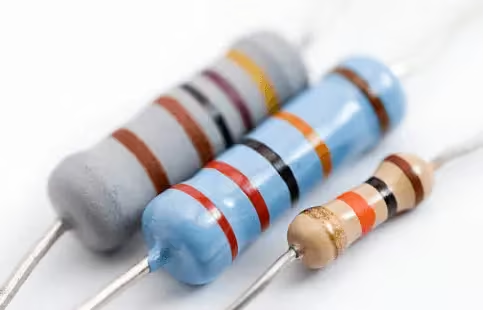
There are typically four, five, or six colour bands on a resistor. This colour-coded system indicates the resistor’s resistance value, tolerance, and sometimes temperature coefficient.
So, we have below set out the essentials of accurately reading and interpreting these resistor bands. This will help ensure you select the right components, so that your design projects deliver the performance you require from them.
Step 1: Identify The Number of Bands on The Resistor
As we referenced above, resistors can markedly vary in the numbers of bands they have:
- On a three or four-band resistor, the first two bands will denote the first two digits of the resistance value in ohms. The third band will be the multiplier, indicating the power of 10 that you will need to multiply the first two digits by.
The fourth band, if present, will indicate tolerance – the degree to which the actual resistance might vary from its nominal value.
If you are looking at a three-band resistor – in other words, this final band is absent – we would advise you to bear in mind the default tolerance is ±20%.
- On a five or six-band resistor – a resistor with high precision – there will be a further colour band to indicate a third significant digit. So, on such a resistor, it will be the fourth band that is the multiplier, and fifth band the tolerance. That leaves the sixth band (if present) to indicate the temperature coefficient.
Step 2: Pick Out the First Band
Bearing in mind the tolerance band, if present, will often be gold or silver, make sure you hold the resistor so that this band is on the right. If you’re still uncertain, look for the band that is wider from the others or separated by a larger gap, as is often the case for the tolerance band.
Then, you will be able to begin reading the resistor from the opposite (as in, left) end.
Step 3: Decode The Colour Bands
It’s easy to find the standard resistor colour code chart online. But for your convenience, we’ll include it here, too:
| Colour | Digit | Multiplier | Tolerance |
| Black | 0 | 1 | – |
| Brown | 1 | 10 | +1% |
| Red | 2 | 100 | +2% |
| Orange | 3 | 1K | – |
| Yellow | 4 | 10K | – |
| Green | 5 | 100K | +0.5% |
| Blue | 6 | 1M | +0.25% |
| Violet | 7 | 10M | +0.1% |
| Grey | 8 | 100M | +0.05% |
| White | 9 | 1G | – |
| Gold | – | 0.1 | +5% |
| Silver | – | 0.01 | +10% |
With the help of this table, you should be able to quickly match the band colours with their corresponding numeric values and tolerances.
Step 4: Calculate The Resistance Value
Now that you have the necessary digits, you will be able to figure out the resistance by combining those digits into a number, before multiplying by the value the multiplier band indicates.
In the event, for instance, of the first two bands on your resistor being yellow (4) and violet (7), and the multiplier band being red (102), the calculation will be 47 x 100 = 4,700 ohms.
Step 5: Take The Tolerance into Account
If there is a band on your resistor that indicates the tolerance – in other words, how much the actual resistance may vary – this will be another specific figure to factor in.
So, for instance, if there is a gold band on your resistor signalling a tolerance of 5%, this means the actual resistance value may vary by 5%.
A Few More Things to Bear in Mind…
As you attempt to read and interpret the bands on your resistors across your design projects, we would urge you to make sure the lighting in the room is good. Having a magnifying glass to hand can also be useful, in case the bands are small or faded.
There are also, of course, digital tools available that largely enable you to bypass the need for manual calculations. The RS Online website, for instance, offers an excellent resistor colour code calculator for precise component identification.
Such an online calculator may be very useful if you need to work at pace, or if the colours on a given resistor have faded. Just make sure you only use a calculator from a reputable source, and perhaps verify its accuracy by using it alongside manual calculations to begin with.